
Here is a full guide on how to install phpIPAM on CentOS 7. This should work on all RHEL based distributuons. For this guide I used competely fresh install of CentOS 7, we will do step by step guide for all applications neede for phpIPAM to run.
I used the following assumptions:
- No software is installed on server (Apache, MySQL, php)
- Database and apache server will run on same machine
- phpipam will run in server root directory (will be accessible via http://ip_address/), no vhosts
- Prettified links will be used
- Only bare minimum configuration will be done
For phpIPAM to work we need to install and configure following applications:
- Apache webserver
- php with support for required modules for phpipam
- MySQL database
1.) Preparing environment and installing required apps
1.1) Setting locale
To start let's set correct locales to be used on server, they are required also for translations. Add following to file /etc/environment for en_US coding, add your encoding if you will use different:
[root@localhost ~]# more /etc/environment
LC_ALL=en_US.utf-8
LANG=en_US.utf-8
1.2) Installing Apache, MySQL, PHP (LAMP) stack packages
Install all required packages for phpipam:
sudo yum install httpd mariadb-server php php-cli php-gd php-common php-ldap php-pdo php-pear php-snmp php-xml php-mysql php-mbstring gitIf you need crypt method for API you need to install also php-mcrypt php extension, which is available on epel-release package:
sudo yum install epel-release
sudo yum install php-mcrypt
1.3) Configuring and running Apache webserver
Main apache configuration is in file /etc/httpd/conf/httpd.conf. Open it and change directory settings for /var/www/html to allow mod_rewrite URL rewrites:
<Directory "/var/www/html">
	Options FollowSymLinks
	AllowOverride all
	Order allow,deny
	Allow from all
</Directory>
We also need to set server name, for now we will use localhost, change it to your FQDN:
ServerName locahost:80Save file and exit.
Set correct timezone to php.ini to avoid php warnings:
[root@localhost html]# grep timezone /etc/php.ini
; Defines the default timezone used by the date functions
; http://php.net/date.timezone
date.timezone = Europe/Ljubljana
Now start apache webserver, and also make sure it starts at boot:
sudo service httpd start
sudo chkconfig httpd on
If using systemd than run following commands:
sudo systemctl start httpd
sudo systemctl enable httpd
Firewall rule is also needed to pass http/https traffic to webserver from external interfaces if needed with following command:
sudo firewall-cmd --permanent --add-port=80/tcp
sudo firewall-cmd --permanent --add-port=443/tcp
sudo firewall-cmd --reload
1.4) Configuring and running MySQL (MariaDB) database server
MariaDB has replaced MySQL server in CentOS 7, so we will use it. First start MariaDB server and make it start at boot time:sudo service mariadb start sudo chkconfig mariadb onIf using systemd than run following commands:
sudo systemctl start mariadb
sudo systemctl enable mariadb
Default options are ok, we just need to set root password, so issue folowing command and follow instructions to harden MariaDB server:
sudo mysql_secure_installation
2.) Downloading phpipam files and configure phpipam
We have configured database and webserver, it is time to install and configure phpipam.
2.1) Downloading phpipam installation files
For the purpose of this guide we will use git to fetch files directly from Github repository. This is preferred and easiest way to setup and maintain phpipam. For other options please read Download guide.
[root@localhost ~]# cd /var/www/html/
[root@localhost html]# git clone https://github.com/phpipam/phpipam.git .
Cloning into '.'...
remote: Counting objects: 10513, done.
remote: Compressing objects: 100% (2/2), done.
remote: Total 10513 (delta 0), reused 0 (delta 0), pack-reused 10511
Receiving objects: 100% (10513/10513), 7.84 MiB | 2.59 MiB/s, done.
Resolving deltas: 100% (7310/7310), done.
[root@localhost html]# git checkout 1.8
[root@localhost html]#
phpipam code is now downloaded in
/var/www/html, which is our document root. To use development version leave out the "git checkout 1.8" command, this will use current MASTER version. If you already checked version 1.8 you can switch to development with "git checkout master".
Also make sure upload folders are accessible for xls/csv imports:
sudo chown apache:apache -R /var/www/html/
sudo chcon -t httpd_sys_content_t /var/www/html/ –R

cd /var/www/html/
find . -type f -exec chmod 0644 {} \;
find . -type d -exec chmod 0755 {} \;

sudo chcon -t httpd_sys_rw_content_t app/admin/import-export/upload/ -R
sudo chcon -t httpd_sys_rw_content_t app/subnets/import-subnet/upload/ -R
sudo chcon -t httpd_sys_rw_content_t css/1.8.1/images/logo/ -R
* If you wish to make separate subfolder for phpipam, e.g. to access phpipam on http://ip_address/phpipam/, than install files to /phpipam/ subfolder:
[root@localhost ~]# cd /var/www/html/
[root@localhost html]# git clone https://github.com/phpipam/phpipam.git phpipam
[root@localhost html]# cd phpipam
[root@localhost html]# git checkout 1.8
2.2) Configuring database connection
Next we need to configure connection to database. To do it we first need to copy over sample config file to config.php that phpipam uses:
[root@localhost html]# cp config.dist.php config.phpNow open config.php file and set settings for database connection. Do not use root user/pass, whatever you put here will be used for further connections to database and users from config.php will be automatically created.
BASE directive should be left at / because we will serve phpipam from default directory http://ip_address/. If you changed this adjust BASE directive accordingly.
3.) phpipam installation
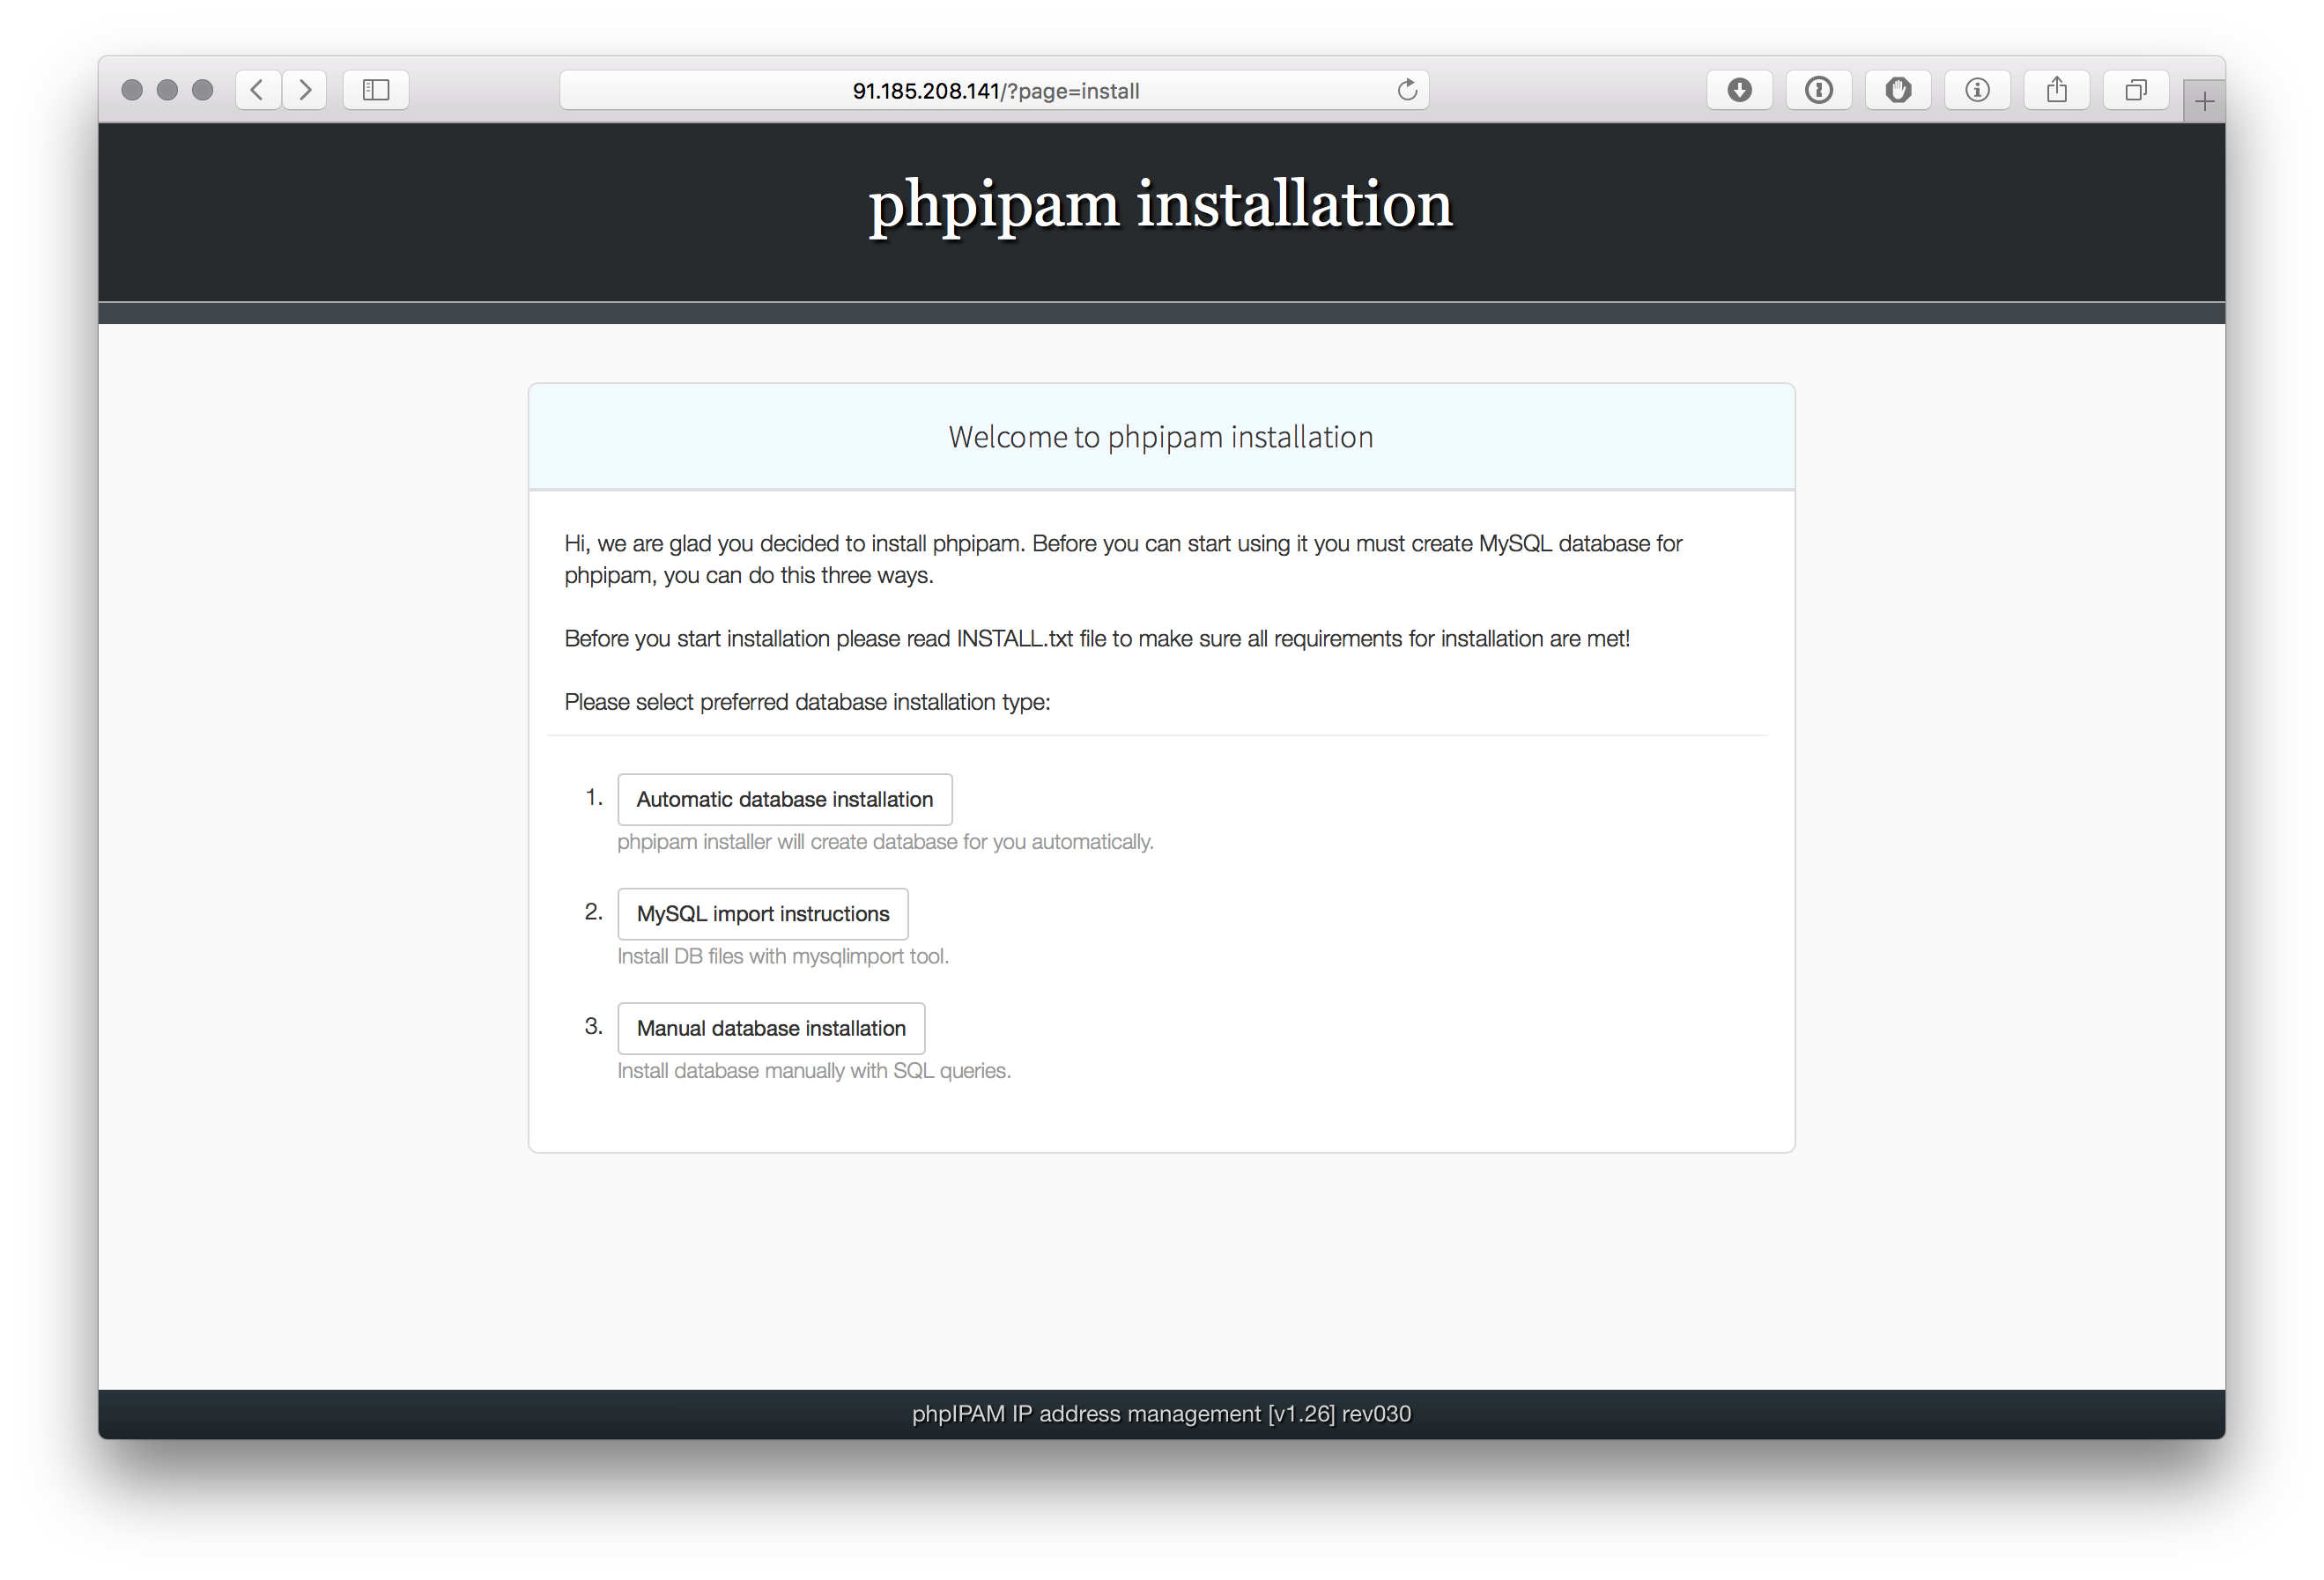
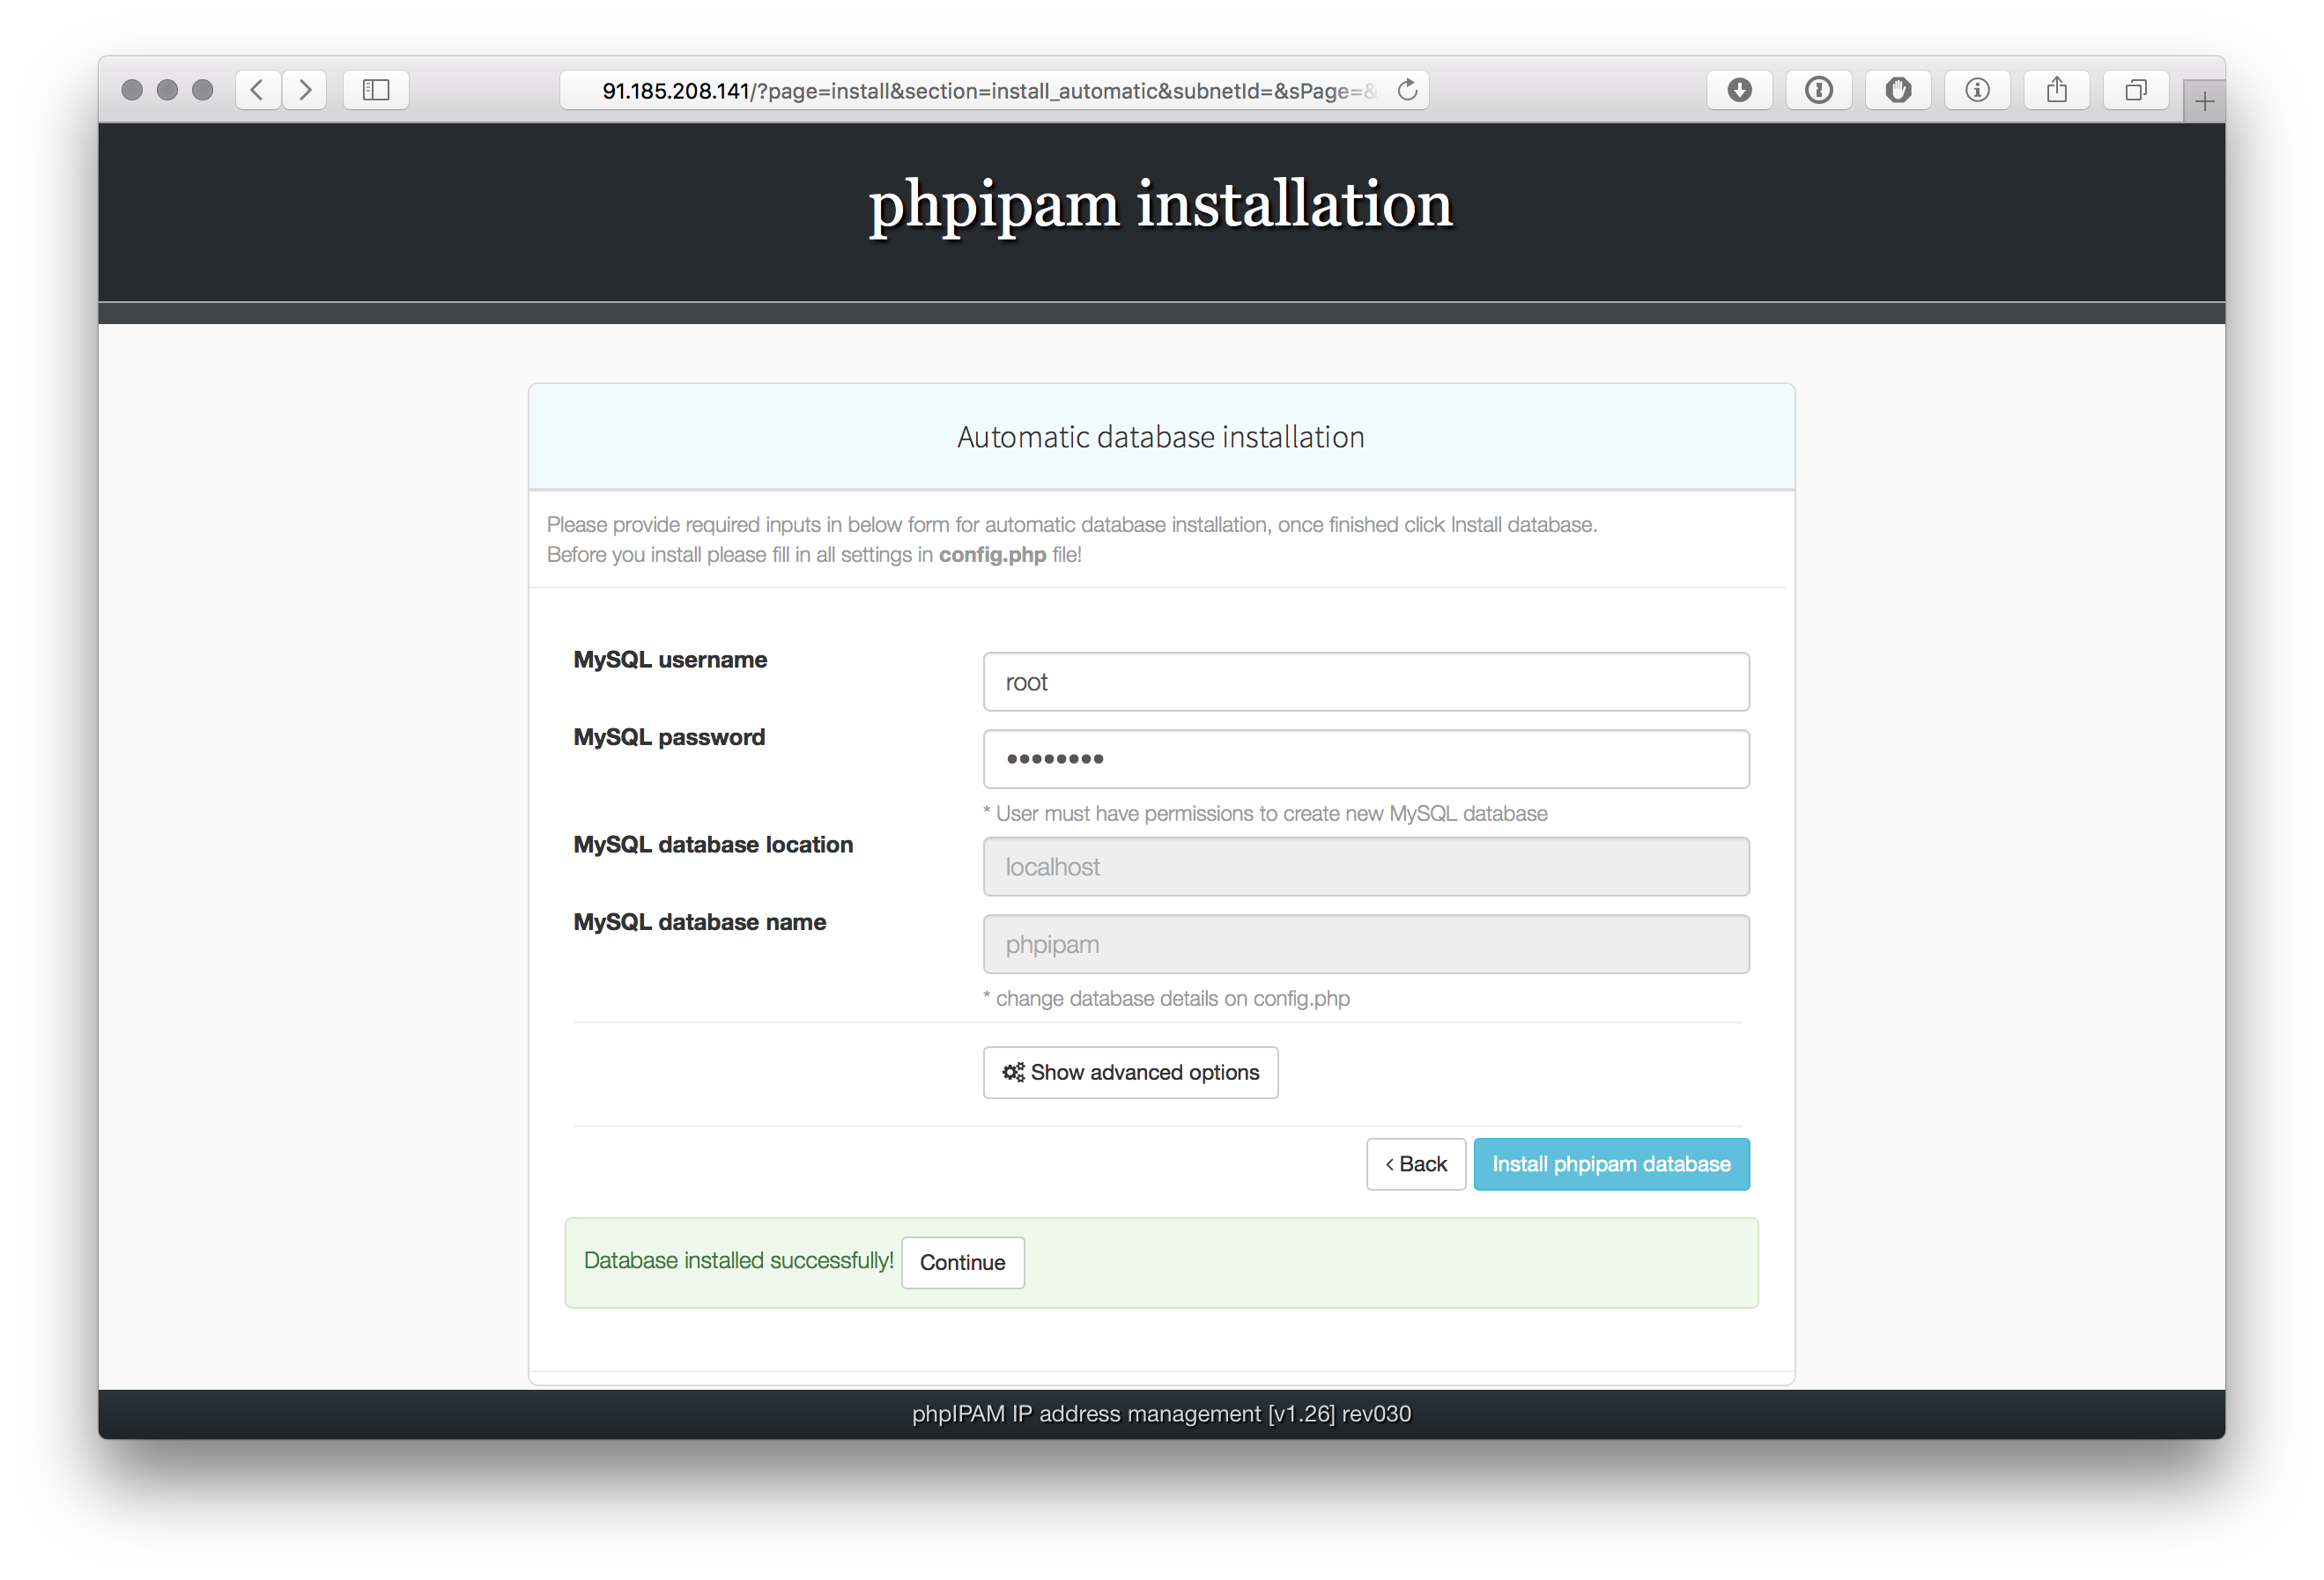
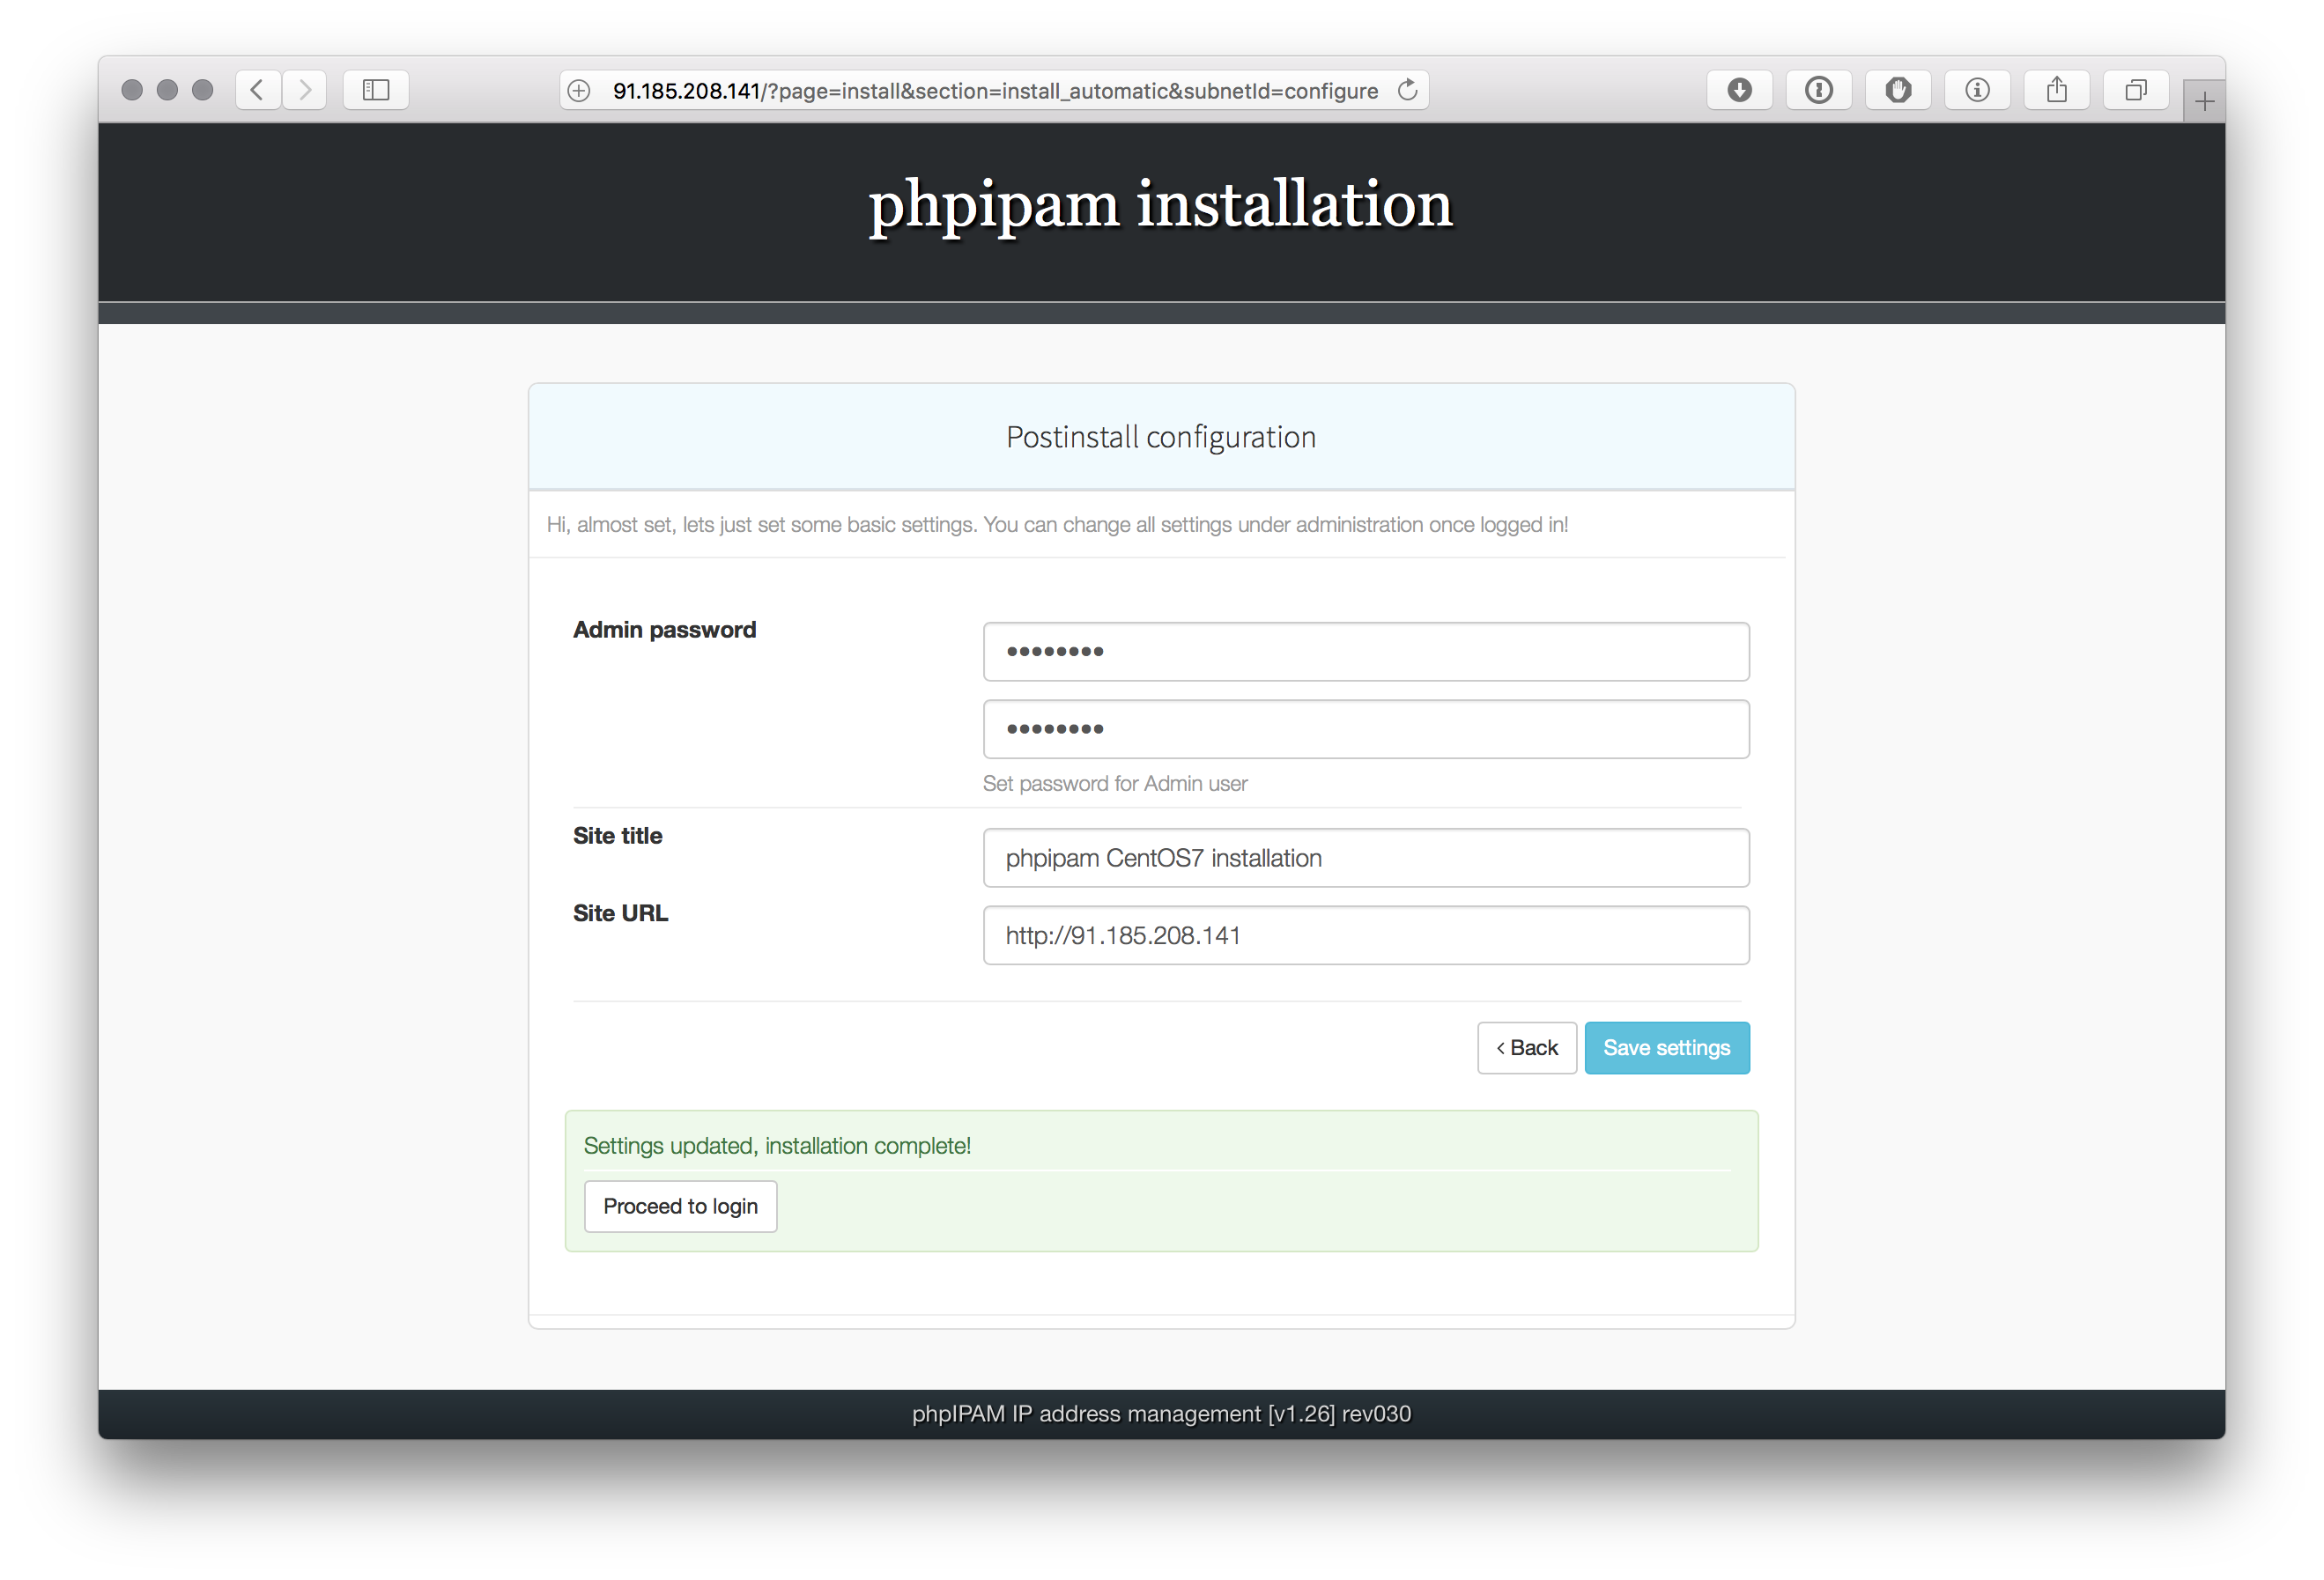
We are now ready to install phpipam. Open browser and go to http://ip_address/ to start with automatic database installation. For MySQL connection enter root username and password you created in point 1.4, this will only be used to create required databases, tables and grants. After installation is completed phpipam will used username/password entered in config.php file to access database, root password is not stored anywhere.
Here are screenshots of install process:
4.) phpipam upgrade
Upgrade process is simple if you are using git, please read this guide for full upgrade guide. In our case all we need to do is pull code updates from github and open browser to start upgrade:
[root@localhost ~]# cd /var/www/html
[root@localhost html]# git pull
5.) Enabling network scanning
To enable network scanning we have two options: disable SELinux or create policy for it. Creating SELinux policy is recommended, please read this topic. For now we will disable SELinux by entering setenforce 0 command:
[root@localhost html]# getenforce
Enforcing
[root@localhost html]# setenforce 0
[root@localhost html]# getenforce
Permissive
[root@localhost html]#
This will enable icmp check from web, discovery etc. To scan networks simultaneously and periodically check address statuses please read this guide.
6.) Backup database via cron
It is recommended that you make daily backups of your database files via cron. For daily backups use following cronjob:
# Backup IP address table, remove backups older than 10 days
@daily /usr/bin/mysqldump -u ipv6 -pipv6admin phpipam > /var/www/html/db/bkp/phpipam_bkp_$(date +"\%y\%m\%d").db
@daily /usr/bin/find /var/www/html/db/bkp/ -ctime +10 -exec rm {} \;
This should be it.